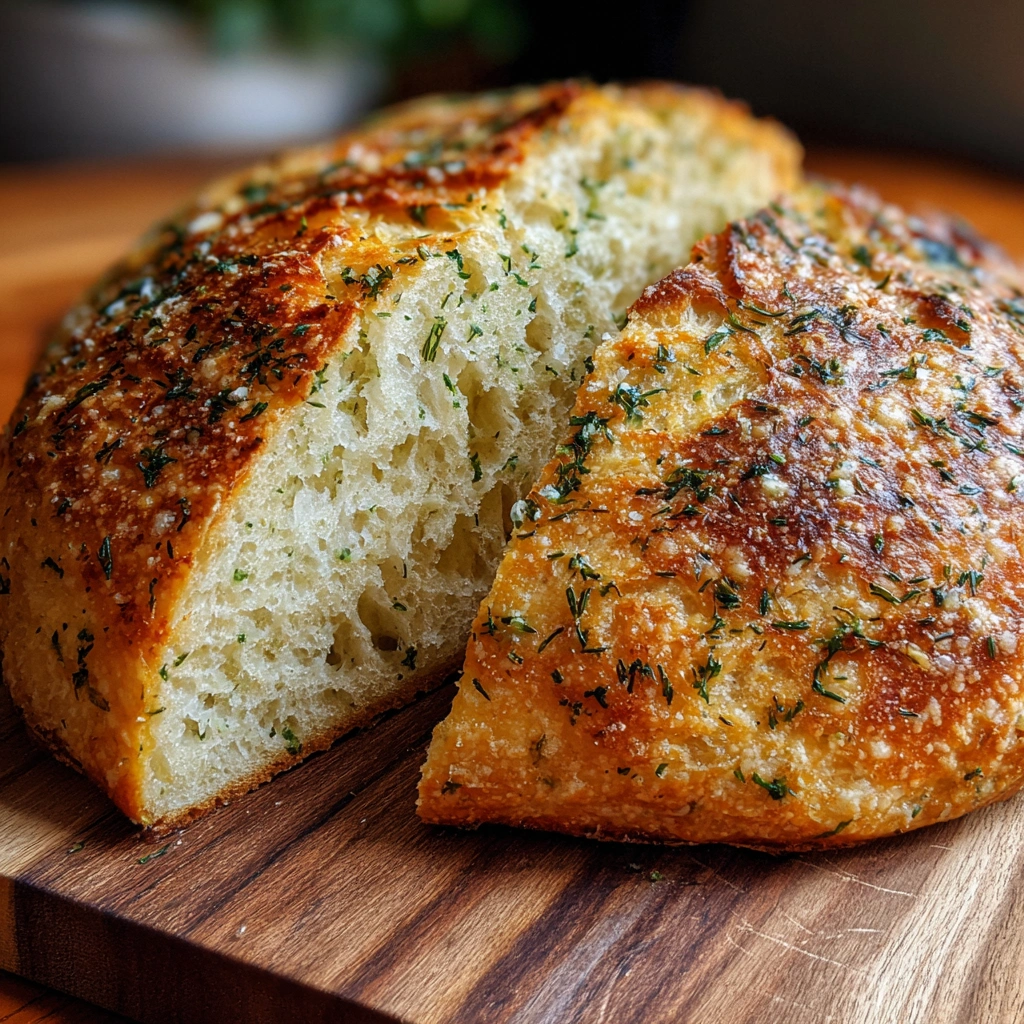
Introduction to No-Knead Dill Gouda Artisan Bread
As a busy mom, I know how precious time can be, especially when it comes to cooking. That’s why I absolutely adore this No-Knead Dill Gouda Artisan Bread. It’s a delightful solution for those hectic days when you want to impress your family without spending hours in the kitchen. The aroma of fresh dill and melted Gouda wafting through your home is simply irresistible. Plus, this bread is so easy to make that even the most novice bakers can whip it up. Trust me, your loved ones will be begging for seconds!
Why You’ll Love This No-Knead Dill Gouda Artisan Bread
This No-Knead Dill Gouda Artisan Bread is a game-changer for busy lives. It requires minimal effort, allowing you to focus on other tasks while it rises. The flavor is out of this world, with the dill adding a fresh twist and the Gouda bringing a creamy richness. Plus, it’s perfect for any occasion, whether it’s a cozy family dinner or a gathering with friends. You’ll be amazed at how quickly it becomes a favorite!
Ingredients for No-Knead Dill Gouda Artisan Bread
Gathering the right ingredients is the first step to creating your No-Knead Dill Gouda Artisan Bread. Here’s what you’ll need:
- All-purpose flour: The backbone of your bread, providing structure and texture. You can substitute with whole wheat flour for a nuttier flavor.
- Salt: Essential for flavor and helps control yeast activity. Sea salt or kosher salt works beautifully here.
- Instant yeast: This little powerhouse helps your dough rise without the need for kneading. If you only have active dry yeast, you can use that too, just activate it in warm water first.
- Warm water: This hydrates the flour and activates the yeast. Aim for a temperature around 110°F for best results.
- Shredded Gouda cheese: Adds a creamy, rich flavor that melts beautifully into the bread. Feel free to experiment with other cheeses like cheddar or mozzarella if you prefer.
- Fresh dill: This herb brings a burst of freshness and a lovely aroma. Dried dill can be used in a pinch, but fresh is always best for flavor.
For exact measurements, check the bottom of the article where you can find everything listed for easy printing. Happy baking!
How to Make No-Knead Dill Gouda Artisan Bread
Now that you have your ingredients ready, let’s dive into the fun part: making your No-Knead Dill Gouda Artisan Bread! This process is straightforward and requires minimal hands-on time. Just follow these simple steps, and you’ll be on your way to baking a delicious loaf.
Step 1: Mix the Dry Ingredients
In a large bowl, combine the all-purpose flour, salt, and instant yeast. Stir them together until they’re well mixed. This step is crucial because it ensures that the yeast and salt are evenly distributed throughout the flour. It’s like giving your bread a solid foundation!
Step 2: Add Warm Water
Next, pour in the warm water. Use a wooden spoon or spatula to mix everything together until a shaggy dough forms. Don’t worry about making it perfect; it should look a bit messy. This is the beauty of no-knead bread! The water hydrates the flour, setting the stage for a lovely rise.
Step 3: Incorporate Dill and Gouda
Now, it’s time to fold in the shredded Gouda cheese and chopped fresh dill. Gently mix until they’re evenly distributed throughout the dough. The cheese will melt into the bread, creating pockets of gooey goodness, while the dill adds a fresh, aromatic touch. It’s a match made in heaven!
Step 4: Let the Dough Rest
Cover the bowl with plastic wrap and let it rest at room temperature for 12 to 18 hours. Yes, you read that right! This long resting period allows the dough to develop flavor and texture without any kneading. Just set it and forget it for a while. You’ll be rewarded with a beautifully risen dough!
Step 5: Preheat the Oven
When you’re ready to bake, preheat your oven to 450°F (230°C). Place a Dutch oven inside to heat up as well. This step is essential because the hot Dutch oven creates a steamy environment, helping your bread achieve that perfect crust. It’s like giving your bread a warm hug!
Step 6: Bake the Bread
Once the oven is hot, carefully remove the Dutch oven. Place the dough inside (you can shape it if you like, but it’s not necessary). Cover it with the lid and bake for 30 minutes. After that, remove the lid and bake for an additional 15 to 20 minutes until the bread is golden brown. The aroma will be heavenly!
Step 7: Cool and Slice
After baking, let the bread cool on a wire rack. This step is crucial for maintaining its texture. If you slice it too soon, it might become gummy. Once it’s completely cool, slice it up and enjoy! You’ll be amazed at how delicious and satisfying your No-Knead Dill Gouda Artisan Bread turns out.
Tips for Success
- Use fresh dill for the best flavor; it makes a world of difference.
- Let the dough rest for the full 18 hours if possible; this enhances the taste.
- Don’t skip preheating the Dutch oven; it’s key for a crispy crust.
- Cool the bread completely before slicing to keep it from getting gummy.
- Experiment with different cheeses for unique flavor profiles!
Equipment Needed
- Large mixing bowl: Any bowl will do, but a glass or ceramic one is ideal for visibility.
- Wooden spoon or spatula: Perfect for mixing; a sturdy fork can work in a pinch.
- Plastic wrap: To cover the dough; a clean kitchen towel can also suffice.
- Dutch oven: Essential for baking; a heavy pot with a lid can be a great alternative.
- Wire rack: For cooling; a plate or cutting board can work too.
Variations
- Herb Infusion: Swap out dill for other fresh herbs like rosemary or thyme for a different flavor profile.
- Cheese Choices: Experiment with different cheeses such as feta for a tangy twist or pepper jack for a spicy kick.
- Whole Grain Option: Use whole wheat flour instead of all-purpose for a heartier, more nutritious loaf.
- Nutty Addition: Add a handful of chopped walnuts or sunflower seeds for extra texture and flavor.
- Sweet Twist: Incorporate a tablespoon of honey or maple syrup for a hint of sweetness that pairs well with the Gouda.
Serving Suggestions
- Pair with Soup: This bread is perfect alongside a warm bowl of tomato or butternut squash soup.
- Cheese Platter: Serve slices with a variety of cheeses and crackers for a delightful appetizer.
- Salad Side: Complement it with a fresh green salad drizzled with vinaigrette.
- Wine Pairing: Enjoy with a glass of white wine, like Sauvignon Blanc, for a lovely evening.
- Presentation: Serve on a wooden board, garnished with extra dill for a rustic touch.
FAQs about No-Knead Dill Gouda Artisan Bread
Can I use different types of cheese in this recipe?
Absolutely! While Gouda adds a creamy richness, you can experiment with other cheeses like cheddar, mozzarella, or even feta for a tangy twist. Each cheese will bring its unique flavor to your No-Knead Dill Gouda Artisan Bread.
How do I store the bread to keep it fresh?
To keep your No-Knead Dill Gouda Artisan Bread fresh, store it in an airtight container at room temperature. It should stay good for up to three days. If you want to keep it longer, consider freezing it. Just slice it first, and wrap it tightly in plastic wrap before placing it in a freezer bag.
Can I make this bread without fresh dill?
Yes, you can! If you don’t have fresh dill on hand, dried dill can be used as a substitute. However, fresh dill provides a brighter flavor, so if you can, I highly recommend using it for the best results.
What if my dough doesn’t rise?
If your dough doesn’t rise, it could be due to the yeast being expired or the water being too hot or too cold. Make sure your water is around 110°F, and check the expiration date on your yeast. If it’s still good, your No-Knead Dill Gouda Artisan Bread should rise beautifully!
Can I double the recipe?
Yes, you can double the recipe! Just make sure you have a large enough bowl for mixing and a bigger Dutch oven for baking. Doubling the ingredients will yield two delicious loaves of No-Knead Dill Gouda Artisan Bread to share with family and friends!
Final Thoughts
Baking this No-Knead Dill Gouda Artisan Bread is more than just a culinary task; it’s a joyful experience that fills your home with warmth and delightful aromas. Each slice is a testament to simplicity and flavor, perfect for sharing with loved ones. Whether you enjoy it fresh out of the oven or as part of a cozy meal, this bread brings people together. I hope you find as much joy in baking it as I do. So roll up your sleeves, embrace the process, and let this bread become a cherished part of your family’s culinary adventures!
Print
No-Knead Dill Gouda Artisan Bread You’ll Love to Bake!
- Prep Time: 15 minutes
- Cook Time: 45 minutes
- Total Time: 12-18 hours (including resting time)
- Yield: 1 loaf 1x
- Category: Bread
- Method: Baking
- Cuisine: American
- Diet: Vegetarian
Description
A simple and delicious no-knead artisan bread infused with dill and Gouda cheese, perfect for any occasion.
Ingredients
- 3 cups all-purpose flour
- 1 1/4 teaspoons salt
- 1/4 teaspoon instant yeast
- 1 1/2 cups warm water
- 1/2 cup shredded Gouda cheese
- 1/4 cup fresh dill, chopped
Instructions
- In a large bowl, mix together the flour, salt, and yeast.
- Add the warm water and stir until a shaggy dough forms.
- Fold in the shredded Gouda cheese and chopped dill.
- Cover the bowl with plastic wrap and let it rest at room temperature for 12-18 hours.
- After resting, preheat your oven to 450°F (230°C) and place a Dutch oven inside to heat up.
- Once the oven is hot, carefully remove the Dutch oven and place the dough inside (you can shape it if desired).
- Cover and bake for 30 minutes, then remove the lid and bake for an additional 15-20 minutes until golden brown.
- Let the bread cool on a wire rack before slicing.
Notes
- For best results, use fresh dill.
- Let the bread cool completely before slicing to maintain its texture.
- This bread can be stored in an airtight container for up to 3 days.
Nutrition
- Serving Size: 1 slice
- Calories: 150
- Sugar: 0g
- Sodium: 200mg
- Fat: 3g
- Saturated Fat: 1.5g
- Unsaturated Fat: 1g
- Trans Fat: 0g
- Carbohydrates: 28g
- Fiber: 1g
- Protein: 5g
- Cholesterol: 5mg