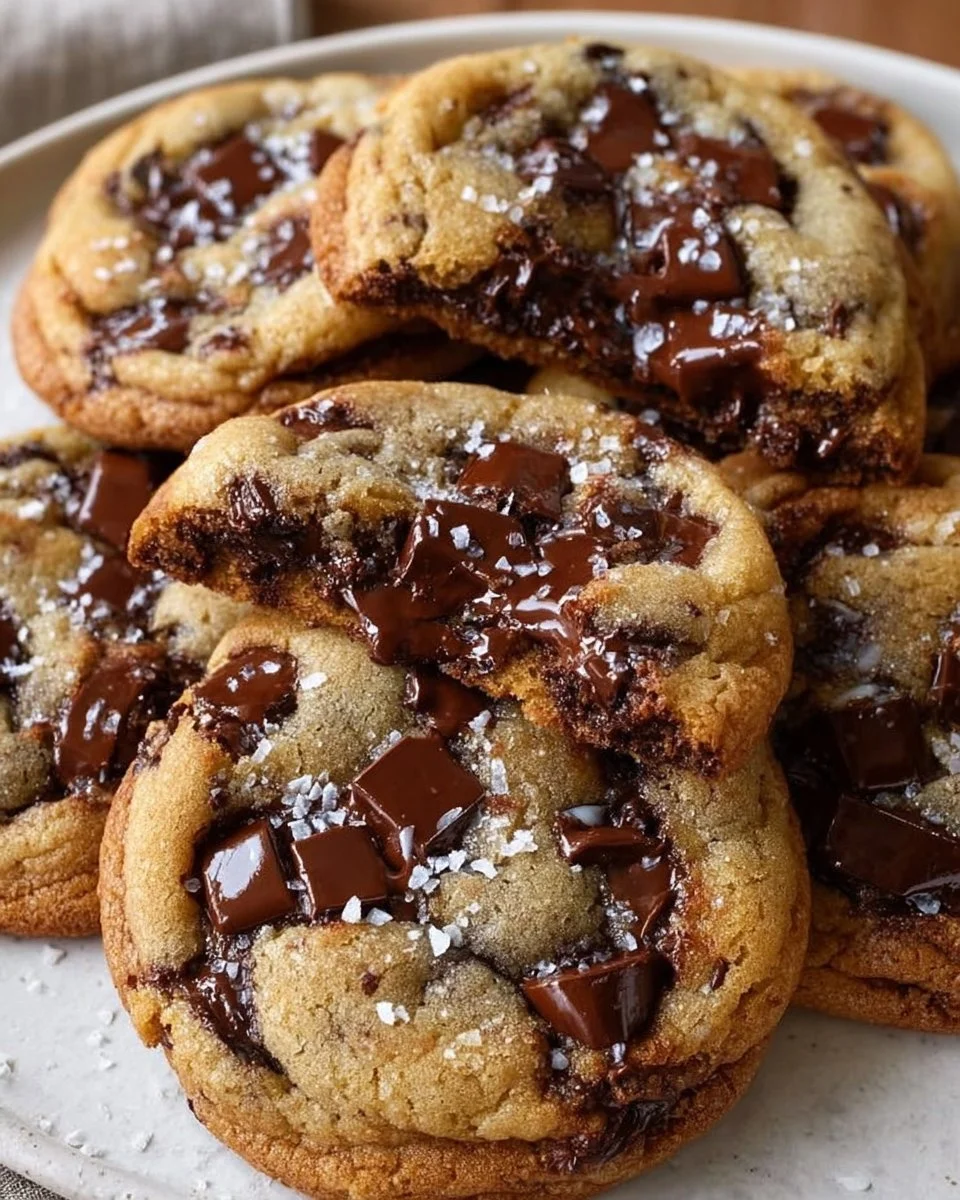
The moment you walk into your kitchen, the air fills with the rich aroma of melting chocolate and warm, buttery goodness. As you scoop gooey mounds of dough onto a baking sheet, the anticipation rises. Your senses tingle with excitement, not just because you’re about to bake cookies, but because these are not just any cookies; these are ultra-thick bakery-style chocolate chip cookies. The kind that boasts crisp, golden edges while the centers remain soft and indulgently gooey. With each cookie, you can taste the depth of flavors layered beautifully together, inviting you to take another bite.
Imagine pulling these beauties from the oven, their surfaces shiny with chocolate spilling over the sides like molten lava. As you take your first bite, you feel the satisfying crunch of the edges giving way to the warm, fudgy center. The subtle sweetness dances on your tongue, complemented by the bittersweet chocolate chips that melt in your mouth. Each cookie promises pure joy and that nostalgic feeling of being wrapped in a warm embrace, reminding you of the best moments spent in a family kitchen, creating delicious memories.
These chocolate chip cookies are not just treats; they are a celebration of comfort, joy, and indulgence. Whether you bake them for a cozy night in, a special occasion, or simply to satisfy a sweet craving, they make every moment a little brighter. Their allure lies not just in their taste but in the way they bring people together. Friends gather around the warm baking sheet, and kids hover, eagerly waiting for the first taste—moments like these are joy encapsulated.
Why You’ll Love This Ultra Thick Bakery Style Chocolate Chip Cookies
There’s a reason chocolate chip cookies hold such a revered place in hearts around the world. They are the quintessential dessert that never goes out of style. This recipe takes that beloved classic and elevates it to bakery-quality perfection, ensuring that every bite is an epic experience.
- Textures that Sing: You’ll revel in the juxtaposition of crispy edges and the soft, ooey-gooey center, creating a divine mouthfeel that keeps you coming back for more.
- Customized to Your Tastes: This recipe invites you to personalize your cookies, whether it’s with a variety of chocolate types, the addition of nuts, or a sprinkle of sea salt on top. Make them your own!
- Perfect for Any Occasion: Whether it’s a birthday party, holiday gathering, or simply a Tuesday night, these cookies shine brightly in any setting. They easily become the highlight of dessert tables.
- Impressive Yet Simple: The beauty of these cookies lies in their simplicity. With straightforward steps, you’ll achieve bakery-quality results right in your own home. Your family and friends will be left wondering where you’ve hidden those baking skills!
Preparation Phase & Tools to Use
Preparation is key in the world of baking, and having the right tools can make all the difference between a good cookie and a fantastic one. Here’s what you need:
- Mixing Bowls: Choose a few sturdy mixing bowls to keep your dry and wet ingredients separate during preparation.
- Electric Mixer: A quality hand mixer or stand mixer saves time and effort when creaming butter and sugar together to achieve that airy texture.
- Measuring Cups & Spoons: Accuracy matters in baking; invest in a reliable set for precise measurements so your cookies turn out perfectly every time.
- Baking Sheets: Use heavy-duty, non-stick baking sheets to ensure even baking and prevent sticking.
- Parchment Paper: Line your baking sheets with this essential tool for easy cleanup and beautifully baked cookies without that dreaded burned bottom.
- Ice Cream Scoop: For uniform cookies, an ice cream scoop helps you create evenly-sized mounds for consistent baking.
Before you jump into baking, make sure you have everything prepared. Pre-measure your ingredients, as this not only saves time but also helps you stay organized in the kitchen.
Ingredients for Ultra Thick Bakery Style Chocolate Chip Cookies
To create these unforgettable cookies, gather the following ingredients:
- 2 large eggs
- 2½ cups all-purpose flour
- 1 teaspoon baking soda
- ½ teaspoon salt (or sea salt)
- 1 cup granulated sugar
- ½ cup packed light brown sugar
- 1 teaspoon vanilla extract
- 3 cups chocolate chips (mix semisweet and dark for a bakery effect)
- 14 tablespoons unsalted butter (melted and slightly cooled)
- Optional for topping: Extra chocolate chips and flaky sea salt
Each ingredient plays a crucial role in creating the perfect cookie landscape. The all-purpose flour provides structure, while the combination of granulated and brown sugars adds sweetness and moisture. The melted butter enriches the dough, giving those perfectly crispy edges. Don’t hesitate to adjust the recipes slightly—try using dark brown sugar for a deeper flavor or swap in your favorite chocolate chip varieties!
How to Make Ultra Thick Bakery Style Chocolate Chip Cookies
Step 1: Mix the Dry Ingredients
In a medium bowl, whisk together the flour, baking soda, and salt. This ensures that the leavening agents distribute evenly throughout the dough and helps achieve that dreamy texture.
Step 2: Prepare the Wet Ingredients
In a large bowl, cream together the melted butter, granulated sugar, and brown sugar until light and fluffy. Then, add the eggs, one at a time, mixing well after each addition. Incorporate the vanilla extract for a hint of warmth that elevates the overall flavor.
Step 3: Combine and Fold
Gradually mix your dry ingredients into the wet mixture, folding gently to combine. Be careful—overmixing can lead to dense cookies. Add in those generous chocolate chips and stir until they are evenly distributed throughout the dough.
Step 4: Chill the Dough
Cover the dough and refrigerate for at least 30 minutes. This essential step enhances the flavor, controls spread during baking, and encourages thicker cookies.
Step 5: Preheat and Prep
Preheat your oven to 350°F (175°C). Line your baking sheets with parchment paper to ensure your cookies don’t stick. Prepare your scoop or spoon for the dough.
Step 6: Scoop and Shape
Use your ice cream scoop to portion out the dough onto the baking sheets, leaving ample space between each mound for spreading. For added effect, place a few extra chocolate chips on top of each cookie.
Step 7: Bake
Bake the cookies for 11-13 minutes until the edges turn golden brown but the centers look slightly underbaked. They will continue to cook on the baking sheet as they cool.
Step 8: Cool and Set
Allow the cookies to cool on the baking sheets for 5-10 minutes before transferring them to wire racks to cool completely. This step is crucial for achieving that perfect texture.
Chef’s Notes & Helpful Tips
- Make-Ahead Tips: Prepare the dough in advance and keep it in the refrigerator for up to two days, or freeze it for up to three months. Just remember to let it soften before baking!
- Cooking Alternatives: You can bake these cookies in an air fryer if you prefer! Just adjust the cooking time to about 8-10 minutes for that same delicious result.
- Customization Ideas: Swap chocolate chips for butterscotch morsels, or add chopped nuts for crunch. Play around with spices like cinnamon or espresso powder for that extra flavor kick!
Common Mistakes to Avoid
Baking chocolate chip cookies can sometimes lead to mishaps. To ensure success, steer clear of these common pitfalls:
- Overmixing the Dough: Stop mixing when the ingredients just come together; this preserves the lightness of the cookies.
- Incorrect Measurements: Baking is a science; use proper measuring techniques and tools to ensure the best results.
- Baking on a Cold or Hot Sheet: Always preheat your oven and start with a cooled or room-temperature baking sheet to prevent uneven baking.
What to Serve With Ultra Thick Bakery Style Chocolate Chip Cookies
Pair your cookies with delightful accompaniments that elevate the experience:
- Milk: The classic choice—dunking the cookies in a cold glass of milk creates a nostalgia that’s hard to resist.
- Ice Cream: Try placing a scoop of your favorite flavor between two cookies for a decadent ice cream sandwich.
- Coffee or Espresso: The robust flavors of coffee balance out the sweetness perfectly and provide a delightful afternoon pick-me-up.
- Hot Chocolate: Cozy up with a steaming cup of hot cocoa topped with whipped cream while enjoying your warm cookies.
- Fruit: Fresh strawberries or raspberries provide a refreshing contrast to the richness of the cookies.
- Tea: A fragrant cup of tea can enhance the chocolatey goodness of your cookies, creating an elegant pairing.
Storage & Reheating Instructions
To keep your cookies fresh, store them in an airtight container at room temperature for up to a week. For longer-lasting freshness, freeze them in a freezer-safe bag or container for up to three months. When you’re ready to enjoy, simply pop them in a preheated oven at 350°F (175°C) for 5-10 minutes until warm. Alternatively, microwave them for about 10-15 seconds for a quick treat.
Estimated Nutrition Information
(Sample values per cookie, based on a batch of 24 cookies):
- Calories: 200
- Protein: 2g
- Carbohydrates: 28g
- Fat: 9g
- Fiber: 1g
- Sugar: 12g
Note: Nutritional values may vary based on specific ingredients used.
FAQs
1. Can I use whole wheat flour instead of all-purpose?
Yes, you can use whole wheat flour, but keep in mind that it may result in a denser texture. For the best balance, try using half all-purpose and half whole wheat.
2. How can I make my cookies flatter?
For a flatter cookie, you can slightly reduce the amount of flour, or you could skip the chilling step altogether. Just be careful not to overbake!
3. What can I do if my dough is too sticky?
If your dough feels overly sticky, refrigerate it for a little longer. Alternatively, you can sprinkle a small amount of flour to help with shaping, but make sure not to add too much, as it could alter the final texture.
4. Can I substitute the chocolate chips?
Absolutely! Feel free to experiment with all kinds of chips—white chocolate, peanut butter chips, or even chopped chocolate bars could add unique flavors.
5. What if I want my cookies to be chewy instead of gooey?
For chewier cookies, reduce the baking time slightly and ensure you don’t overmix the dough. The result will be beautifully chewy yet still deliciously satisfying.
In closing, indulge in the joy of baking these ultra-thick bakery-style chocolate chip cookies. They deliver on flavor, texture, and nostalgia, reminding us of the little things that make life sweet. Now, whisk away those doubts, gather your ingredients, and create something extraordinary! Your kitchen awaits this delightful magic, and so does your eager taste buds. Happy baking!
Print
Ultra Thick Bakery Style Chocolate Chip Cookies
- Prep Time: 15 minutes
- Cook Time: 13 minutes
- Total Time: 45 minutes
- Yield: 24 cookies 1x
- Category: Dessert
- Method: Baking
- Cuisine: American
- Diet: Vegetarian
Description
Indulge in the joy of baking these ultra-thick bakery-style chocolate chip cookies, featuring crisp edges and a soft, gooey center.
Ingredients
- 2 large eggs
- 2½ cups all-purpose flour
- 1 teaspoon baking soda
- ½ teaspoon salt (or sea salt)
- 1 cup granulated sugar
- ½ cup packed light brown sugar
- 1 teaspoon vanilla extract
- 3 cups chocolate chips (mix semisweet and dark for a bakery effect)
- 14 tablespoons unsalted butter (melted and slightly cooled)
- Optional for topping: Extra chocolate chips and flaky sea salt
Instructions
- Mix the dry ingredients: In a medium bowl, whisk together the flour, baking soda, and salt.
- Prepare the wet ingredients: In a large bowl, cream together the melted butter, granulated sugar, and brown sugar until light and fluffy. Add the eggs, one at a time, mixing well, and then incorporate the vanilla extract.
- Combine and fold: Gradually mix the dry ingredients into the wet mixture, being careful not to overmix. Stir in the chocolate chips.
- Chill the dough: Cover and refrigerate for at least 30 minutes.
- Preheat the oven: Preheat your oven to 350°F (175°C) and line baking sheets with parchment paper.
- Scoop and shape: Use an ice cream scoop to portion the dough onto the sheets, leaving space between each mound.
- Bake: Bake the cookies for 11-13 minutes until the edges are golden brown.
- Cool and set: Allow cookies to cool on the baking sheets for 5-10 minutes before transferring to wire racks.
Notes
Dough can be prepared in advance and refrigerated for up to 2 days or frozen for up to 3 months.
Nutrition
- Serving Size: 1 cookie
- Calories: 200
- Sugar: 12g
- Sodium: 150mg
- Fat: 9g
- Saturated Fat: 5g
- Unsaturated Fat: 4g
- Trans Fat: 0g
- Carbohydrates: 28g
- Fiber: 1g
- Protein: 2g
- Cholesterol: 30mg