Introduction to Garlic Dill Pickle Chips
As a busy mom, I know how precious time can be, especially when it comes to meal prep. That’s why I absolutely adore making Garlic Dill Pickle Chips! These crunchy snacks are not only quick to whip up, but they also pack a punch of flavor that will impress your family and friends. Imagine the tangy taste of dill combined with the robust essence of garlic, all wrapped up in a delightful crunch. Perfect for a last-minute appetizer or a tasty side, these pickles are a must-try for anyone looking to elevate their snacking game!
Why You’ll Love This Garlic Dill Pickle Chips
Garlic Dill Pickle Chips are a game-changer for busy lives. They’re incredibly easy to make, taking just a little over an hour from start to finish. The best part? You can customize the flavor to suit your taste buds! Whether you enjoy them as a snack, a side, or a topping, these pickles deliver a burst of flavor that will keep you coming back for more. Trust me, your taste buds will thank you!
Ingredients for Garlic Dill Pickle Chips
Gathering the right ingredients is key to making delicious Garlic Dill Pickle Chips. Here’s what you’ll need:
- Cucumbers: Fresh cucumbers are the star of this recipe. Look for firm, crisp ones for the best crunch.
- Water: This is the base for your brine. Use filtered water for a cleaner taste.
- White vinegar: It adds that tangy kick that makes pickles irresistible. You can substitute with apple cider vinegar for a different flavor.
- Sugar: Just a touch balances the acidity of the vinegar. Feel free to adjust based on your sweetness preference.
- Salt: Essential for flavor and preservation. Kosher salt works best, but sea salt is a good alternative.
- Garlic: Minced garlic infuses the pickles with a robust flavor. You can add more if you’re a garlic lover!
- Dill seeds: These tiny seeds pack a punch of dill flavor. If you can’t find them, fresh dill can be used instead.
- Black peppercorns: They add a subtle heat and depth to the brine. You can skip them if you prefer a milder taste.
For exact measurements, check the bottom of the article where you can find everything listed for easy printing. Happy pickling!
How to Make Garlic Dill Pickle Chips
Making Garlic Dill Pickle Chips is a delightful adventure that anyone can embark on. Follow these simple steps, and you’ll have a crunchy snack that’s bursting with flavor!
Step 1: Prepare the Cucumbers
Start by slicing your fresh cucumbers into thin rounds. Aim for about a quarter-inch thickness for the perfect crunch. Once sliced, sprinkle them with salt and toss to coat. This step is crucial! Let them sit for an hour. The salt draws out excess moisture, enhancing the flavor and crunch of your pickles.
Step 2: Make the Brine
While your cucumbers are resting, it’s time to whip up the brine. In a saucepan, combine water, white vinegar, sugar, minced garlic, dill seeds, and black peppercorns. Bring this mixture to a boil over medium heat. The boiling process is essential as it helps dissolve the sugar and salt, creating a flavorful brine that will soak into your cucumbers.
Step 3: Rinse and Pack
After an hour, rinse the cucumbers under cold water to remove excess salt. This step ensures your pickles aren’t overly salty. Now, it’s time to pack! Place the rinsed cucumber slices into sterilized jars, packing them tightly but not squishing them. This way, every bite will be filled with that delicious garlic dill flavor.
Step 4: Pour the Brine
Carefully pour the hot brine over the packed cucumbers. Make sure they are fully submerged. This is where the magic happens! The brine will infuse the cucumbers with that tangy, garlicky goodness. If you notice any air bubbles, gently tap the jars to release them.
Step 5: Seal and Cool
Once the brine is poured, seal the jars tightly with lids. Allow them to cool to room temperature before placing them in the refrigerator. Cooling is important because it helps the flavors meld together beautifully.
Step 6: Refrigerate
Finally, pop those jars into the fridge! For the best flavor, let them sit for at least 24 hours before diving in. The longer they sit, the more flavorful they become. Trust me, the wait is worth it!
Tips for Success
- Use fresh, firm cucumbers for the best crunch.
- Don’t skip the salting step; it enhances flavor and texture.
- Experiment with spices! Add red pepper flakes for a spicy kick.
- Make sure your jars are sterilized to keep your pickles fresh.
- Label your jars with the date to track freshness.
Equipment Needed
- Cutting board: A sturdy surface for slicing cucumbers. A plate can work in a pinch.
- Sharp knife: Essential for clean, even slices. A vegetable peeler can help if you prefer thinner cuts.
- Large bowl: For salting cucumbers. Any mixing bowl will do.
- Saucepan: To make the brine. A small pot is sufficient.
- Sterilized jars: For storing pickles. Recycled glass jars work great!
Variations of Garlic Dill Pickle Chips
- Spicy Garlic Dill Pickle Chips: Add red pepper flakes or sliced jalapeños to the brine for a fiery twist.
- Sweet and Spicy Pickles: Increase the sugar in the brine and add a dash of cayenne pepper for a sweet heat.
- Herb-Infused Pickles: Toss in fresh herbs like thyme or oregano for an aromatic flavor boost.
- Low-Sodium Option: Reduce the salt in the brine and use a salt substitute for a healthier version.
- Garlic Lovers’ Delight: Double the amount of minced garlic for an extra punch of flavor.
Serving Suggestions for Garlic Dill Pickle Chips
- Serve alongside sandwiches for a crunchy contrast.
- Pair with cheese and crackers for a delightful snack platter.
- Enjoy them as a topping on burgers or hot dogs.
- Mix into potato salad for an unexpected twist.
- Serve with a refreshing drink like iced tea or lemonade.
FAQs about Garlic Dill Pickle Chips
How long do Garlic Dill Pickle Chips last in the fridge?
These delicious pickles can be stored in the refrigerator for up to two months. Just make sure they stay submerged in the brine to maintain their crunch and flavor!
Can I use other types of cucumbers?
Absolutely! While I recommend using pickling cucumbers for their crunch, you can also use English cucumbers or even Persian cucumbers. Just keep in mind that the texture may vary slightly.
What can I do if my pickles are too salty?
If your Garlic Dill Pickle Chips turn out too salty, try rinsing them under cold water before serving. You can also adjust the salt in future batches to suit your taste.
Can I can these pickles for long-term storage?
This recipe is designed for refrigerator pickling, which is quick and easy. If you want to can them for long-term storage, you’ll need to follow proper canning procedures to ensure safety.
What are some creative ways to use Garlic Dill Pickle Chips?
These pickles are versatile! Use them in salads, as a topping for tacos, or even chop them up and mix them into your favorite dip for an extra zing. The possibilities are endless!
Final Thoughts
Making Garlic Dill Pickle Chips is more than just a cooking project; it’s a delightful experience that brings joy to your kitchen. The satisfying crunch and zesty flavor can brighten up any meal or snack time. Plus, the pride of creating something delicious from scratch is truly rewarding. Whether you’re sharing them with family or savoring them solo, these pickles are sure to become a favorite. So, roll up your sleeves, gather your ingredients, and dive into this flavorful adventure. Trust me, once you taste these homemade gems, you’ll wonder how you ever lived without them!
Print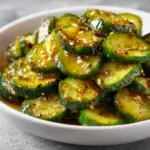
Garlic Dill Pickle Chips: A Crunchy Snack You’ll Love!
- Prep Time: 15 minutes
- Cook Time: 10 minutes
- Total Time: 1 hour 25 minutes
- Yield: 4 jars 1x
- Category: Snack
- Method: Pickling
- Cuisine: American
- Diet: Vegetarian
Description
Garlic Dill Pickle Chips are a crunchy and flavorful snack that combines the tanginess of dill pickles with the robust taste of garlic.
Ingredients
- 4 cups cucumbers, sliced
- 2 cups water
- 1 cup white vinegar
- 1/4 cup sugar
- 2 tablespoons salt
- 4 cloves garlic, minced
- 2 tablespoons dill seeds
- 1 teaspoon black peppercorns
Instructions
- In a large bowl, combine the sliced cucumbers with salt and let them sit for 1 hour.
- In a saucepan, combine water, vinegar, sugar, minced garlic, dill seeds, and black peppercorns. Bring to a boil.
- Remove the cucumbers from the bowl and rinse them under cold water.
- Pack the cucumbers into sterilized jars.
- Pour the hot brine over the cucumbers, ensuring they are fully submerged.
- Seal the jars and let them cool to room temperature.
- Refrigerate for at least 24 hours before serving for the best flavor.
Notes
- For extra spice, add red pepper flakes to the brine.
- These pickles can be stored in the refrigerator for up to 2 months.
- Adjust the sugar and salt to taste based on your preference.
Nutrition
- Serving Size: 1 jar
- Calories: 50
- Sugar: 5g
- Sodium: 300mg
- Fat: 0g
- Saturated Fat: 0g
- Unsaturated Fat: 0g
- Trans Fat: 0g
- Carbohydrates: 12g
- Fiber: 1g
- Protein: 1g
- Cholesterol: 0mg