Introduction to Red Velvet Cheesecake Swirl Cake
Welcome to the world of indulgence with my Red Velvet Cheesecake Swirl Cake! If you’re like me, juggling a busy life while trying to whip up something special, this dessert is your new best friend. It’s not just a cake; it’s a showstopper that combines the rich, velvety goodness of red velvet with a creamy cheesecake swirl. Perfect for impressing guests or simply treating yourself after a long day, this cake is a delightful way to bring a little joy into your kitchen. Trust me, your taste buds will thank you!
Why You’ll Love This Red Velvet Cheesecake Swirl Cake
This Red Velvet Cheesecake Swirl Cake is a dream come true for busy moms and professionals alike. It’s easy to make, requiring just a handful of ingredients and simple steps. The combination of flavors is nothing short of heavenly, with the rich red velvet perfectly complementing the creamy cheesecake. Plus, it’s visually stunning, making it a fantastic centerpiece for any gathering. You’ll love how quickly it disappears!
Ingredients for Red Velvet Cheesecake Swirl Cake
Gathering the right ingredients is the first step to creating your Red Velvet Cheesecake Swirl Cake. Here’s what you’ll need:
- All-purpose flour: This is the backbone of your cake, providing structure and texture.
- Granulated sugar: Sweetness is key! It balances the flavors and helps create a moist cake.
- Baking soda: This leavening agent gives your cake that lovely rise.
- Salt: Just a pinch enhances all the flavors, making them pop.
- Cocoa powder: Adds a subtle chocolate flavor, complementing the red velvet beautifully.
- Vegetable oil: Keeps the cake moist and tender; you can also use canola oil if you prefer.
- Buttermilk: This adds richness and a slight tang, making the cake incredibly flavorful.
- Large eggs: They bind everything together and help with the cake’s structure.
- Red food coloring: The star of the show! It gives the cake its signature vibrant hue.
- Vanilla extract: A splash of this adds warmth and depth to the flavor.
- White vinegar: This reacts with the baking soda, helping the cake rise and adding a bit of tang.
- Cream cheese: The heart of the cheesecake swirl, it brings a rich, creamy texture.
- Powdered sugar: Sweetens the cheesecake batter and gives it a smooth finish.
- Vanilla extract (for cheesecake): Just like in the cake, it enhances the flavor of the cheesecake layer.
- Large eggs (for cheesecake): These help set the cheesecake, giving it that perfect creamy consistency.
For exact measurements, check the bottom of the article where you can find everything listed for easy printing. Happy baking!
How to Make Red Velvet Cheesecake Swirl Cake
Step 1: Preheat and Prepare
First things first, let’s get that oven preheating to 350°F (175°C). While it warms up, grab your 9-inch springform pan and grease it well. I like to use a bit of butter or cooking spray to ensure the cake slides out easily later. Trust me, there’s nothing worse than a cake that sticks! Once your pan is ready, set it aside and let the anticipation build. You’re about to create something truly delicious!
Step 2: Mix Dry Ingredients
In a large mixing bowl, combine your all-purpose flour, granulated sugar, baking soda, salt, and cocoa powder. I like to whisk them together to ensure everything is evenly distributed. This step is crucial because it helps the cake rise beautifully. The cocoa powder adds a subtle chocolate flavor that complements the red velvet perfectly. Once mixed, set this bowl aside and get ready for the next step. Your dry ingredients are the foundation of this delightful cake!
Step 3: Combine Wet Ingredients
Now, let’s move on to the wet ingredients! In another bowl, whisk together the vegetable oil, buttermilk, eggs, red food coloring, vanilla extract, and white vinegar. The food coloring is what gives our cake that stunning red hue, so don’t be shy with it! Mixing these ingredients well ensures a smooth batter. The buttermilk adds a lovely tang, making the cake moist and flavorful. Once everything is combined, it’s time to bring the wet and dry ingredients together!
Step 4: Combine Wet and Dry Mixtures
Pour the wet mixture into the bowl with the dry ingredients. Gently mix them together until just combined. Be careful not to overmix; a few lumps are perfectly fine! This is where the magic begins, as the vibrant red batter starts to form. The key is to combine them just enough to create a smooth batter without losing that lovely texture. Once you see no dry flour, you’re ready for the next step!
Step 5: Prepare the Cheesecake Batter
In a separate bowl, beat the softened cream cheese until it’s nice and smooth. Then, add in the powdered sugar, vanilla extract, and eggs. Mix until everything is well combined and creamy. This cheesecake batter is the heart of our swirl cake, bringing a rich, velvety texture that pairs beautifully with the red velvet. Make sure there are no lumps; we want it silky smooth! Once ready, set this aside while we layer our batters.
Step 6: Layer the Batters
Now comes the fun part! Pour half of the red velvet batter into your prepared springform pan. Then, add half of the cheesecake batter on top. Repeat this process with the remaining batters. Once both batters are in the pan, take a knife and gently swirl them together. This creates that beautiful marbled effect. Don’t overdo it; a few swirls will do! You want to see both colors peeking through, promising a delightful surprise in every slice.
Step 7: Bake the Cake
Place your cake in the preheated oven and bake for 60-70 minutes. The aroma will fill your kitchen, making it hard to resist! To check for doneness, insert a toothpick into the center. If it comes out clean or with a few moist crumbs, it’s ready. If it’s still wet, give it a few more minutes. Remember, every oven is different, so keep an eye on it. You want that perfect balance of moist and firm!
Step 8: Cool and Serve
Once baked, remove the cake from the oven and let it cool in the pan for about 15 minutes. Then, carefully run a knife around the edges to loosen it before removing the sides of the springform pan. Allow the cake to cool completely on a wire rack. This step is crucial for the flavors to settle. Once cooled, slice it up and serve! You can enjoy it plain or add a dollop of whipped cream for extra indulgence. Your Red Velvet Cheesecake Swirl Cake is ready to impress!
Tips for Success
- Use room temperature ingredients for a smoother batter.
- Don’t overmix the batter; a few lumps are okay!
- Check your cake a few minutes before the timer goes off.
- Let the cake cool completely before slicing for cleaner pieces.
- For a festive touch, top with whipped cream or chocolate ganache.
Equipment Needed
- 9-inch springform pan: Perfect for easy removal; a regular cake pan works too.
- Mixing bowls: Use medium and large bowls for mixing ingredients.
- Whisk: Essential for blending wet and dry ingredients; a fork can work in a pinch.
- Spatula: Great for scraping down the sides of bowls.
- Toothpick: For checking cake doneness; a skewer can be a good substitute.
Variations
- Gluten-Free: Substitute all-purpose flour with a gluten-free blend for a delicious gluten-free version.
- Chocolate Lovers: Add chocolate chips to the red velvet batter for an extra chocolatey twist.
- Nutty Delight: Incorporate chopped walnuts or pecans into the cheesecake layer for added texture and flavor.
- Fruit Infusion: Swirl in some raspberry or strawberry puree for a fruity contrast to the rich flavors.
- Lower Sugar: Use a sugar substitute in the cake and cheesecake batter to reduce sweetness without sacrificing taste.
Serving Suggestions
- Pair with a scoop of vanilla ice cream for a delightful contrast.
- Serve alongside fresh berries for a pop of color and freshness.
- Drizzle with chocolate ganache for an extra indulgent touch.
- Garnish with mint leaves for a refreshing finish.
- Enjoy with a cup of coffee or tea to balance the sweetness.
FAQs about Red Velvet Cheesecake Swirl Cake
Can I make this cake ahead of time?
Absolutely! This Red Velvet Cheesecake Swirl Cake can be made a day in advance. Just store it in the refrigerator, covered, to keep it fresh. The flavors actually deepen overnight, making it even more delicious!
What can I use instead of buttermilk?
If you don’t have buttermilk on hand, don’t worry! You can make a quick substitute by mixing one cup of milk with a tablespoon of vinegar or lemon juice. Let it sit for about 5 minutes, and you’re good to go!
How do I store leftovers?
Leftovers can be stored in the refrigerator for up to three days. Just make sure to cover the cake well to keep it moist. You can also freeze slices for up to three months—just wrap them tightly in plastic wrap!
Can I use a different type of food coloring?
Yes! While red food coloring is traditional, you can experiment with gel food coloring for a more vibrant hue. Just be cautious with the amount, as gel colors are more concentrated than liquid ones.
What’s the best way to serve this cake?
This cake is delightful on its own, but you can elevate it by serving it with whipped cream, fresh berries, or a drizzle of chocolate ganache. It’s perfect for any occasion!
Final Thoughts
Creating this Red Velvet Cheesecake Swirl Cake is more than just baking; it’s about crafting a moment of joy. The vibrant colors and rich flavors come together to create a dessert that not only tastes divine but also brings smiles to the faces of those you love. Whether it’s a special occasion or a simple family dinner, this cake is sure to impress. I hope you find as much happiness in making it as I do. So, roll up your sleeves, embrace the mess, and let the magic of baking fill your kitchen with warmth and delight!
Print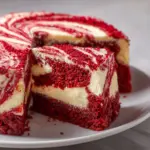
Red Velvet Cheesecake Swirl Cake: Your New Favorite Dessert!
- Prep Time: 30 minutes
- Cook Time: 70 minutes
- Total Time: 1 hour 40 minutes
- Yield: 12 servings 1x
- Category: Dessert
- Method: Baking
- Cuisine: American
- Diet: Vegetarian
Description
A deliciously rich and visually stunning dessert that combines the classic flavors of red velvet cake with a creamy cheesecake swirl.
Ingredients
- 2 cups all-purpose flour
- 1 1/2 cups granulated sugar
- 1 teaspoon baking soda
- 1 teaspoon salt
- 1 teaspoon cocoa powder
- 1 1/2 cups vegetable oil
- 1 cup buttermilk
- 2 large eggs
- 2 tablespoons red food coloring
- 1 teaspoon vanilla extract
- 1 teaspoon white vinegar
- 16 oz cream cheese, softened
- 1/2 cup powdered sugar
- 1 teaspoon vanilla extract (for cheesecake)
- 2 large eggs (for cheesecake)
Instructions
- Preheat your oven to 350°F (175°C) and grease a 9-inch springform pan.
- In a large bowl, mix together the flour, sugar, baking soda, salt, and cocoa powder.
- In another bowl, whisk together the oil, buttermilk, eggs, food coloring, vanilla extract, and vinegar.
- Combine the wet and dry ingredients until just mixed.
- In a separate bowl, beat the cream cheese until smooth, then add powdered sugar, vanilla extract, and eggs, mixing until well combined.
- Pour half of the red velvet batter into the prepared pan, followed by half of the cheesecake batter. Repeat with the remaining batters.
- Use a knife to swirl the batters together gently.
- Bake for 60-70 minutes or until a toothpick inserted in the center comes out clean.
- Allow to cool before removing from the pan and serving.
Notes
- For best results, use room temperature ingredients.
- Store leftovers in the refrigerator for up to 3 days.
- Can be topped with whipped cream or chocolate ganache for extra indulgence.
Nutrition
- Serving Size: 1 slice
- Calories: 450
- Sugar: 35g
- Sodium: 300mg
- Fat: 25g
- Saturated Fat: 10g
- Unsaturated Fat: 5g
- Trans Fat: 0g
- Carbohydrates: 50g
- Fiber: 2g
- Protein: 6g
- Cholesterol: 80mg